Servicing and checking up on a split air conditioner (AC) is similar to servicing other types of AC units, but with a few specific tasks related to the design of split systems. Here’s a step-by-step guide to help you maintain and check your split AC:
1. Turn Off Power to the Unit
Before starting any work, switch off the air conditioner and unplug it from the power outlet. You can also turn off the circuit breaker that supplies power to the unit for added safety.
2. Clean the Air Filters
-
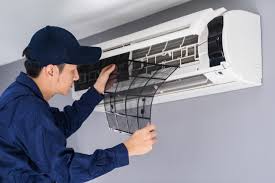
- Open the front panel of the indoor unit to access the air filters.
- Remove the filters carefully.
- If the filters are very dirty, clean them by vacuuming with a brush attachment to remove dust and debris.
- If there is heavy buildup, wash the filters with warm water and mild detergent. Allow the filters to dry completely before reinstalling them.
- If the filters are damaged or worn out, replace them with new ones.
3. Clean the Evaporator Coil (Indoor Unit)
- Action:
- The evaporator coil is located behind the air filters. Gently brush off any dust or debris using a soft brush.
- If necessary, spray a coil cleaner on the evaporator coil (you can buy coil cleaner from hardware stores). Let it sit for a few minutes, then wipe away any excess.
- You can also use compressed air to blow out dirt from areas that are hard to reach.
4. Clean the Condenser Coil (Outdoor Unit)
- Action:
- The condenser coil is located in the outdoor unit. Inspect the coil for any dirt, leaves, or debris.
- Use a vacuum with a brush attachment or an air blower to remove dirt from the coil.
- If needed, rinse the condenser coil with water to remove more stubborn dirt.
- After rinsing, let the coil dry completely.
5. Straighten the Fins (Evaporator and Condenser Coils)
-
- Use a fin comb to straighten any bent fins on both the evaporator and condenser coils. Bent fins can restrict airflow and reduce cooling efficiency.
- Be gentle while using the comb to avoid damaging the coils.
6. Clear the Condensate Drain
-
- Locate the condensate drain line, which removes excess water from the indoor unit.
- Use a wet/dry vacuum to clear any clogs in the condensate drain.
- You can also flush the drain with a mixture of water and mild detergent to prevent mold or algae buildup. This will help the drain work efficiently.
7. Inspect the Refrigerant Lines and Insulation
-
- Check the refrigerant lines (the pipes connecting the indoor and outdoor units) for any signs of wear, damage, or leaks.
- Ensure the pipe insulation is intact. If it's damaged or worn out, replace it to prevent energy loss.
- Optional: If you suspect refrigerant leaks or improper cooling, you can use a refrigerant gauge and manifold to check the refrigerant pressure. However, refrigerant handling requires expertise, so it’s best to contact a professional for this task.
8. Inspect the Electrical Components
-
- Inspect the indoor and outdoor unit for any loose or damaged wires, connections, or terminals.
- Use a voltage tester to ensure there’s no electrical power running through the unit while you’re servicing it.
- Tighten any loose connections or replace damaged wires if necessary.
9. Check and Clean the Fan Blades
-
- Inspect the fan blades in both the indoor and outdoor units for any dirt or buildup.
- Use a soft brush to clean the blades gently. If necessary, use a vacuum cleaner with a brush attachment to clean the blades thoroughly.
10. Check for Leaks in the System
-
- Visually check the system for any refrigerant leaks. If you suspect that refrigerant is leaking, the system will not cool properly. This requires a professional to refill or repair the refrigerant.
- If you are qualified, you can use refrigerant pressure gauges to check if the levels are correct.
11. Test the Air Conditioner
-
- After cleaning and checking the system, reassemble all parts, including the air filter and front panel.
- Plug the unit back in and turn it on.
- Set the AC to cool mode and check if it is cooling properly. Check for any strange noises, abnormal airflow, or if the unit is cooling effectively.
12. Schedule Professional Maintenance (Annually)
Even if you perform regular servicing, it's a good idea to have a professional technician inspect the system once a year to check for refrigerant levels, gas leaks, and ensure that all components are working efficiently.
Spare Parts You Might Need:
- Air Filters: If the current filters are dirty or damaged.
- Coil Cleaner: If there is heavy dirt buildup on the coils.
- Refrigerant: If you suspect that the refrigerant level is low or if the system is not cooling properly.
- Fan Motor: If the fan is malfunctioning.
- Electrical Components: If any wires or terminals are damaged.
Recomendation for best Performance:
- Regular Maintenance: Clean and check the split AC system every 3-6 months for optimal performance.
- Professional Help: If you're unsure about handling refrigerant, electrical components, or anything complex, don’t hesitate to call a certified professional.
- Energy Efficiency: A well-maintained AC unit will work more efficiently, which can reduce your energy bills.
Let me know if you need more details or clarification on any of the steps!